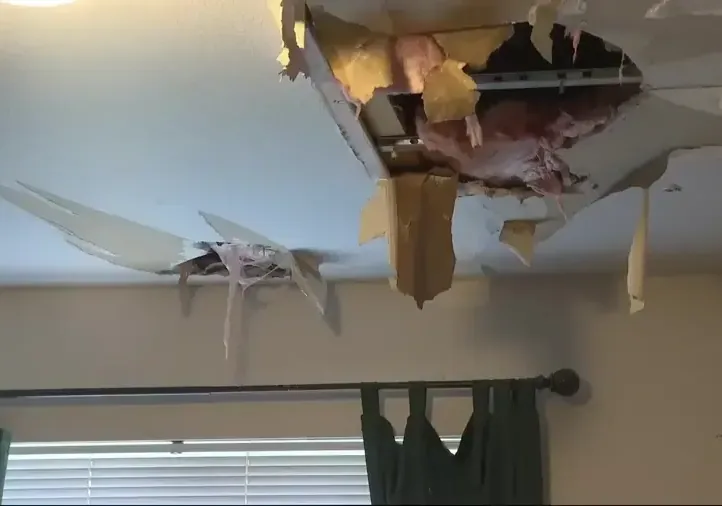
A ceiling stain in Tarzana deserves attention even after the dripping stops. This neighborhood of the City of Los Angeles has a hot summer Mediterranean climate, and the timing of rain is useful information when investigating an overhead leak. The room needs a clear inspection record that connects the visible mark to the source, the concealed materials and the repair that follows.
Key takeaways
- Keep people away from a sagging ceiling and wet electrical fittings.
- Record whether dripping follows rain, fixture use or cooling equipment operation.
- Inspect the room above and the concealed assembly before selecting repairs.
- Track ceiling moisture at labeled locations until retained materials reach the drying goal.
Record the pattern before the mark changes
A useful first photograph includes the whole ceiling, the nearby wall and a recognizable room feature. A closer image can then capture the stain edge, blistered paint or an active drip.
Together, those views let a technician locate the same area even if the discoloration spreads before the visit.
The homeowner can note when the mark appeared and what was happening at the time, from rainfall to use of an upstairs fixture. Repeated observations are more useful than a guess about the roof.
A stain that looks unchanged still belongs in the record if fresh droplets appear nearby.
Ventura Boulevard, Lindley Avenue and Victory Boulevard help describe different parts of the neighborhood when arranging access. Inside the property, the inspection needs a more precise description: the room, the ceiling corner, the nearest opening and whether another occupied space sits above the damage.
Those details support a focused ceiling leak assessment.
- Photograph the room from a dry, stable location.
- Write down the first observed dripping and later changes.
- Identify furniture or stored items beneath the affected ceiling.
Separate the source investigation from the stain repair
Roof entry, indoor plumbing and equipment drainage require different source checks. The technician begins with the actual building arrangement and the reported timing, then follows the wet path through accessible areas.
A ceiling directly below a bathroom prompts different inspection questions from a ceiling directly below a roof void.
Water can travel along framing or around an opening before becoming visible. The darkest spot therefore helps locate damage, while the inspection also looks outward and above it.
Adjacent wall tops, penetrations and the opposite side of an assembly can explain why the visible mark developed away from the entry point.
The source contractor records the defect found and the work completed. The restoration record separately describes water already held in the building.
Keeping those descriptions distinct gives the owner a useful answer to both immediate questions: what stopped the release, and what still needs drying before the ceiling can be closed.
Keep access clear beneath compromised finishes
A bulging or sagging finish needs assessment before anyone works beneath it. Furniture recovery can wait when reaching it would put someone under loose material or beside wet electrical components.
The affected area should remain separated from normal household traffic until the condition of the ceiling and nearby utilities has been evaluated.
An occupant should leave ceiling openings, fixture handling and overhead removal to appropriate professionals. Poking a wet bulge creates an uncontrolled release and puts the person directly below the damaged finish.
The contractor can plan access with the room cleared and the water collection method already arranged.
A practical access plan identifies a dry entrance, space for equipment and a route that avoids the affected ceiling. Pets, visitors and household storage also need consideration.
Clear passage allows inspection and removal to proceed without repeatedly moving belongings through the work area or spreading debris into adjoining rooms.
- Keep children and pets outside the affected room.
- Avoid switches and fittings in the wet area.
- Describe loose finishes before anyone enters to move contents.
Follow roof water through the layers beneath it
Topanga State Park marks the neighborhood's southern boundary, and Caballero Canyon lies on the north side of the Santa Monica mountains. A homeowner arranging a roof water damage inspection can provide the property location together with photographs of the interior damage.
Roof access and exterior observations belong with the contractor's source investigation.
Once accessible, the space above the stain is checked for wet backing, insulation and framing. Material names matter because a painted finish, absorbent insulation and structural timber do not present the same drying access.
The inspection should identify what is present and how far moisture extends into each layer.
Openings need a stated purpose, such as reaching a wet cavity or removing detached material. Photographs before and after access show the layers exposed and help explain the subsequent repair scope.
An opening that reveals more water should lead to a revised map rather than an unchanged plan based on the initial stain.
Give retained materials their own measurement points
A ceiling drying record works best when each reading can be found again. The technician identifies the room and measurement location, records the material, and uses suitable instrument settings.
The comparison area should be a relevant dry material so that the completion decision has a clear basis.
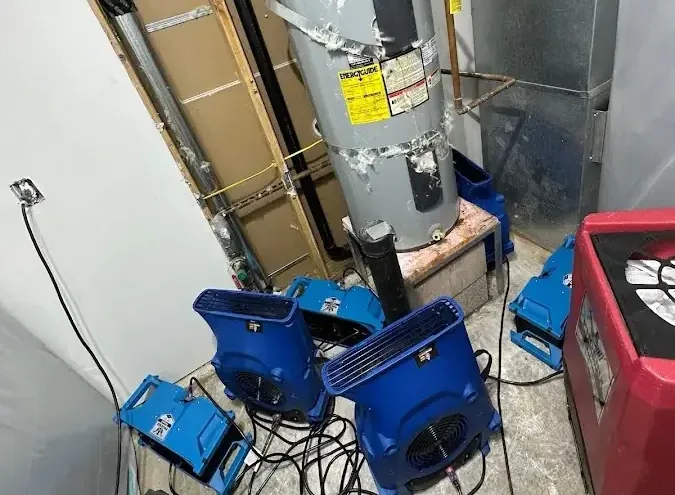
Structural drying combines access, air movement and moisture removal from the indoor air. Equipment placement should account for concealed pockets and fragile finishes, with followup readings showing which materials are responding.
A dry feeling surface does not complete the inspection of a cavity behind that surface.
If a location stops improving, the team revisits the reason before changing equipment. Remaining insulation, blocked access or continuing water entry may need attention.
The project notes should describe the change made and the reading that prompted it, allowing the next visit to evaluate whether that adjustment helped.
- Label the wettest accessible points on the room sketch.
- Keep the material and meter settings with each entry.
- Recheck the same locations after a drying adjustment.
Keep household use clear of the open ceiling
An occupied home needs a clear boundary between the work area and usable rooms. The owner and contractor can decide where belongings will be stored, which doorway provides access and how the room will be checked while equipment runs.
Those decisions should be settled before furniture returns beneath an open assembly.
A room can look tidy while still requiring monitoring. Temporary floor protection, removed trim and equipment cables should remain part of the access discussion until the contractor releases the space for normal use.
The household needs to know which areas are available and which still belong to the drying project.
Communication should include any new dripping or change in the ceiling after source repair. A homeowner who notices fresh staining can provide a dated photograph and the activity occurring nearby.
That observation gives the contractor a specific location to revisit while the original measurement record remains available for comparison.
Close the ceiling with a usable repair record
Finish work begins with the condition of retained materials documented and any unresolved source issue addressed. The repair contractor needs the dimensions and location of openings, the material layers removed and the condition of adjoining surfaces.
This information helps plan reinstatement without covering a cavity still awaiting evaluation.
The final file should pair the original room photographs with the exposed assembly and the closing readings. Source repair paperwork belongs alongside those records, with a clear description of the work each contractor performed.
The homeowner can then follow the sequence from discovery to drying to finish repair.
A painted ceiling is only the visible end of the project. The useful handoff also explains any remaining decorating work, access panels or followup observations requested after future rain.
Keeping that information together makes a later stain easier to compare with the completed repair rather than starting the investigation from memory.
Questions
Does a ceiling stain after rain always require roof replacement?
The appropriate repair follows the defect found during inspection. A contractor can evaluate the roof opening or assembly involved and describe the necessary work before the owner commits to a replacement scope.
What information helps when reporting a new overhead drip?
The room name, photographs, recent rainfall and activity in the space above give the inspecting team a useful starting point. A note about changing stain size also helps track the progression.
Can the room be painted as soon as dripping stops?
The finish schedule should follow the documented condition of the ceiling layers. Source control, drying completion and preparation of damaged surfaces all need to be addressed before decorating.
Why inspect the wall beside the ceiling mark?
Moisture can continue into a wall junction and remain behind finishes outside the obvious stain. Including that junction in the survey gives the repair contractor a fuller picture of affected materials.